How to Use a Sling with TAVOR SAR/X95
Written by Tom Alibrando
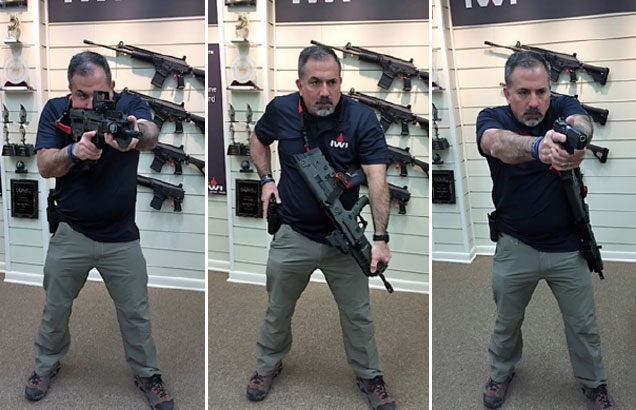
The sling can be used as a carry strap, to free up an operator’s arms and hands, for maintaining control of the rifle while switching to a sidearm or other weapon system, and can even be used as a shooting aid. The IWI X95™ has five sling attachment points, and while it can accept a wide variety of quick detach slings, today we’ll go over how to take full advantage of the sling we most recommend, the IWI Savvy Sniper Sling.
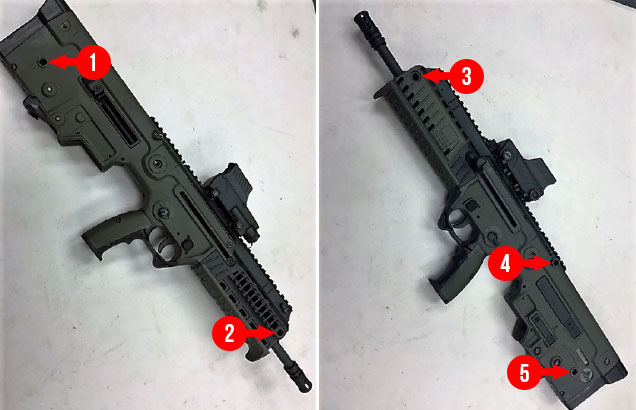
Attachment Points
The X95 has 5 attachment points; three on the primary side and two on the support side. The attachment point at the rear of the Picatinny rail can be reversed during a conversion.
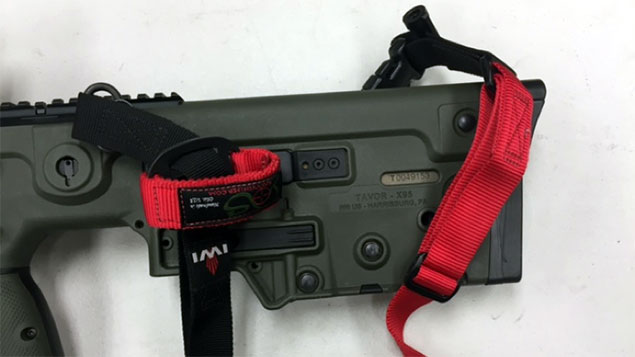
Attaching the Sling
First, make sure to size your sling and make sure that it integrates with all of your gear. When attaching the sling, ensure that the end with the loop slider is on the support side and accessible with your support side arm. The sliding section should be further down on the weapon’s body. The rear portion of the sling has a single tri-glide buckle that is used for adjustment. The tail portion of the sling should attach on the rear attachment point on the opposite side of the weapon. This will allow the sling to be versatile and to be used in many different scenarios.
Fitting to Your Body Type
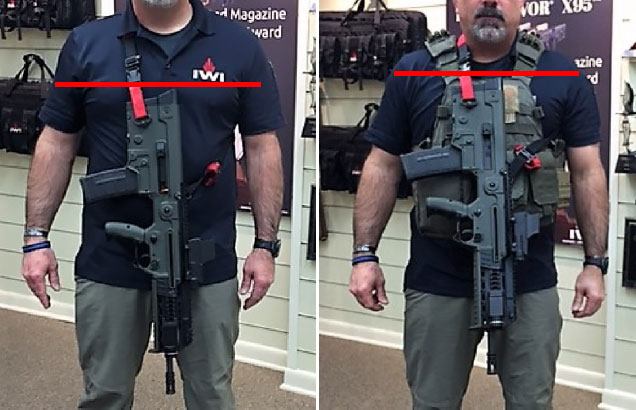
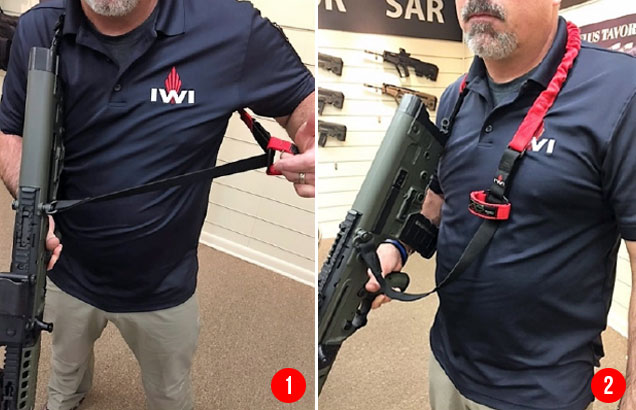
If you are a right handed shooter with the X95™, the weapon should lay to the support side of the body. In the event you are wearing a pistol, the rifle will lay on the opposite side allowing clear access to your pistol. Your head and left arm should go through the sling. The support side of the weapon (left side for right handed shooters) should lay across the body. The slider should be all the way forward when making the initial adjustment. The top of the stock should lay across the center of your chest (see image above to the left). If it is too high or low, pull the weapon off and adjust the rear tri-glide until the weapon is at the desired height.
If you are wearing body armor, the sling must be readjusted to have the weapon lay at the proper height. The picture above to the right shows that the weapon is too high and additional length must be added into the sling.
Once the sling is set, it should not interfere with the weapon being presented onto the target. Having the rear attachment point set to the opposite side of the forward attachment point has two distinct advantages:
- When the weapon lays across the body, the stock is pulled into the shooter, keeping everything relatively compact.
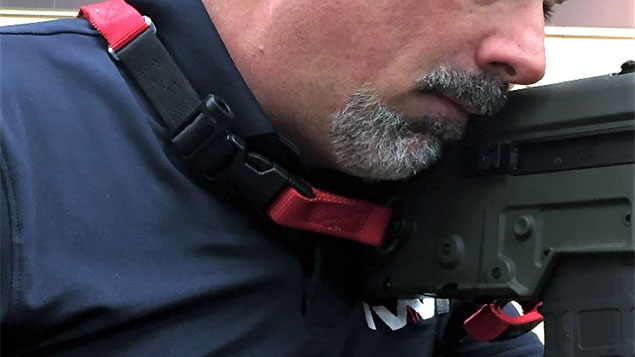
- When the weapon is transferred from the right shoulder to the left shoulder, the sling does not cut across the neck (see photo above). It also allows the system to be easily transferred from one side to the other.
Occasionally, the weapon must be stowed for situations like climbing or cuffing in the case of a law enforcement officer. The sling allows for quick transitions from actively using the rifle to securing it to the back so that your arms and legs have maximum mobility.
To stow the system, ensure the weapon is on safe then extend the sling using the sliding buckle. Pull your support arm rearward through the loop of the sling so the strap is hanging around your neck. Plunge your primary arm through the sling (reverse which arm is in the sling loop) and swing the weapon to your back. To ensure that the weapon is sitting as high as possible, pull the sliding buckle downwards until the sling is at its shortest length. This will raise the height of the weapon on the back and bring the weapon in tighter.
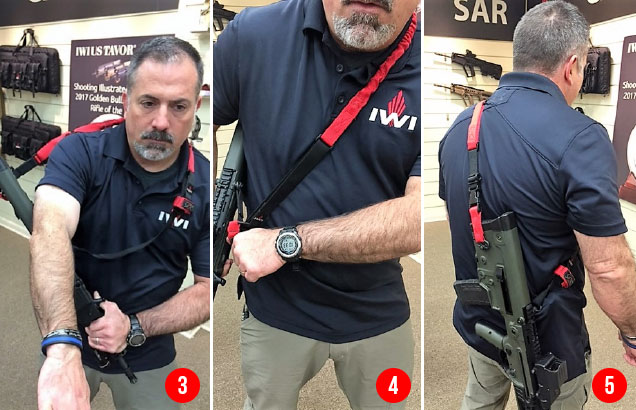
To bring the weapon back into a fighting position, simply reverse the order: extend the loop, pull your primary arm through, extend the support arm through the loop and readjust the length.
The sling can be configured for single-point use by simply attaching both QD attachments at the rear of the stock. The advantage to this is mobility with the weapon. The disadvantage is that the weapon tends to hang lower and pendulums when the user is moving. Having at least one hand to control the weapon is important.
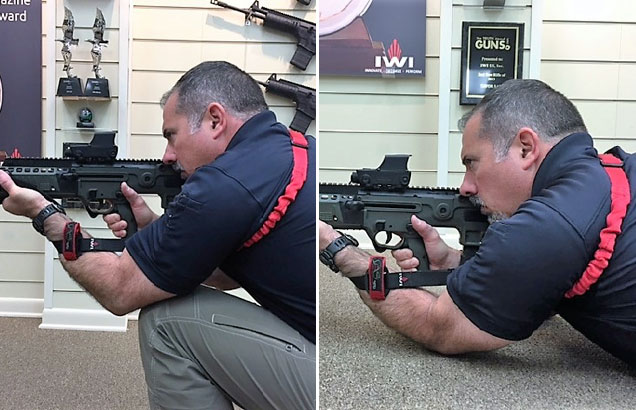
For long distance shots in positions other than prone, the sling can be used to create a more stable position. First, attach the sling at its forward most point. Occasionally, the QD mount will have to be twisted into the attachment point because the hand guard hole may be snug. After the sling is secure, extend the length and bring your support arm inside the loop. Once through the loop, twist the sling
around one turn so your hand extends around the outside edge of the sling. Grasp the underside of the handguard; the sling should aid in pulling the weapon into your body.
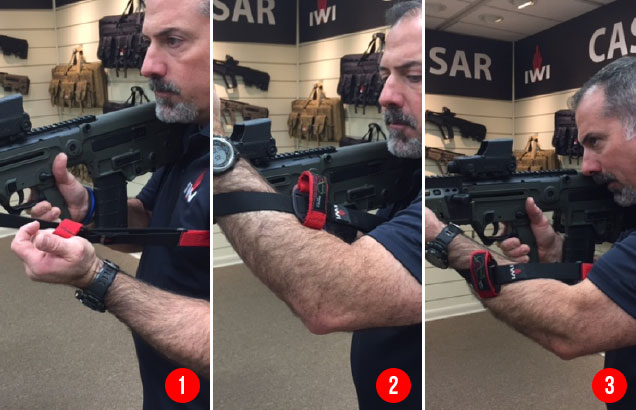
This technique can assist with positions other than standing. If the sling is not creating enough tension, simply pull the arm out and shorten the overall length. After adjusting, re-wrap the arm and pull in again.
Finally, the sling offers the ability to transition to another weapon when required. A properly adjusted sling which is worn on the opposite side of the weapon will allow for rapid access to a secondary weapon. It also keeps the weapon secure in case rapid movement is necessary.
Learning how to fire your weapon accurately and manipulate its controls is not enough. It’s critical to understand how to use your sling and your gear quickly and to its full capacity so that when seconds count you’re not fumbling with gear.
